Facebook marketing is changing at such a fast pace that it’s nearly impossible to keep up with the latest features, trends, and ad specs.
That’s why, even highly experienced marketers do not always know all the Facebook advertising hacks & tips that would benefit them big time.
For example, did you know that you can:
- See a list with the names of all your Facebook page fans?
- Set a target audience for every Facebook post you publish?
- Create Facebook posts that include up to 10 images inside a carousel?
This article has one main goal and it’s to have you browse the 12 hidden Facebook features and think…

Seriously, I hope that you’ll learn at least one new Facebook marketing hack from this article, hopefully even more.
So here they are, the super secret Facebook features to engage more fans, beat the competition, and wow your boss.
1. Set a New Target Audience for Each Post
Hack #1 in one sentence: As you publish a post on your Facebook page, you can tell Facebook whom you want to target, so specific audiences will see that post.
On most branded Facebook pages, not all the posts are relevant to the same audience.
For example, food delivery services need to attract both customers, restaurant owners, and delivery couriers.
Or in case of Plated’s Facebook page, some of their fans might like savoury food while others have a sweet tooth.

If you’re engaging with multiples audiences across your Facebook posts, you’ll want every post to reach the right audience.
Here’s why:
If your Facebook post is relevant to people seeing it in their newsfeed, it will have a higher Relevance Score, and your post could have a higher organic reach.
Luckily for all Facebook marketers, there’s a fairly new feature called the Audience Optimization tool.
How to optimize every Facebook post’s audience?
As you’re creating a new Facebook page post, click on the small target icon in the lower left corner of your unpublished post.
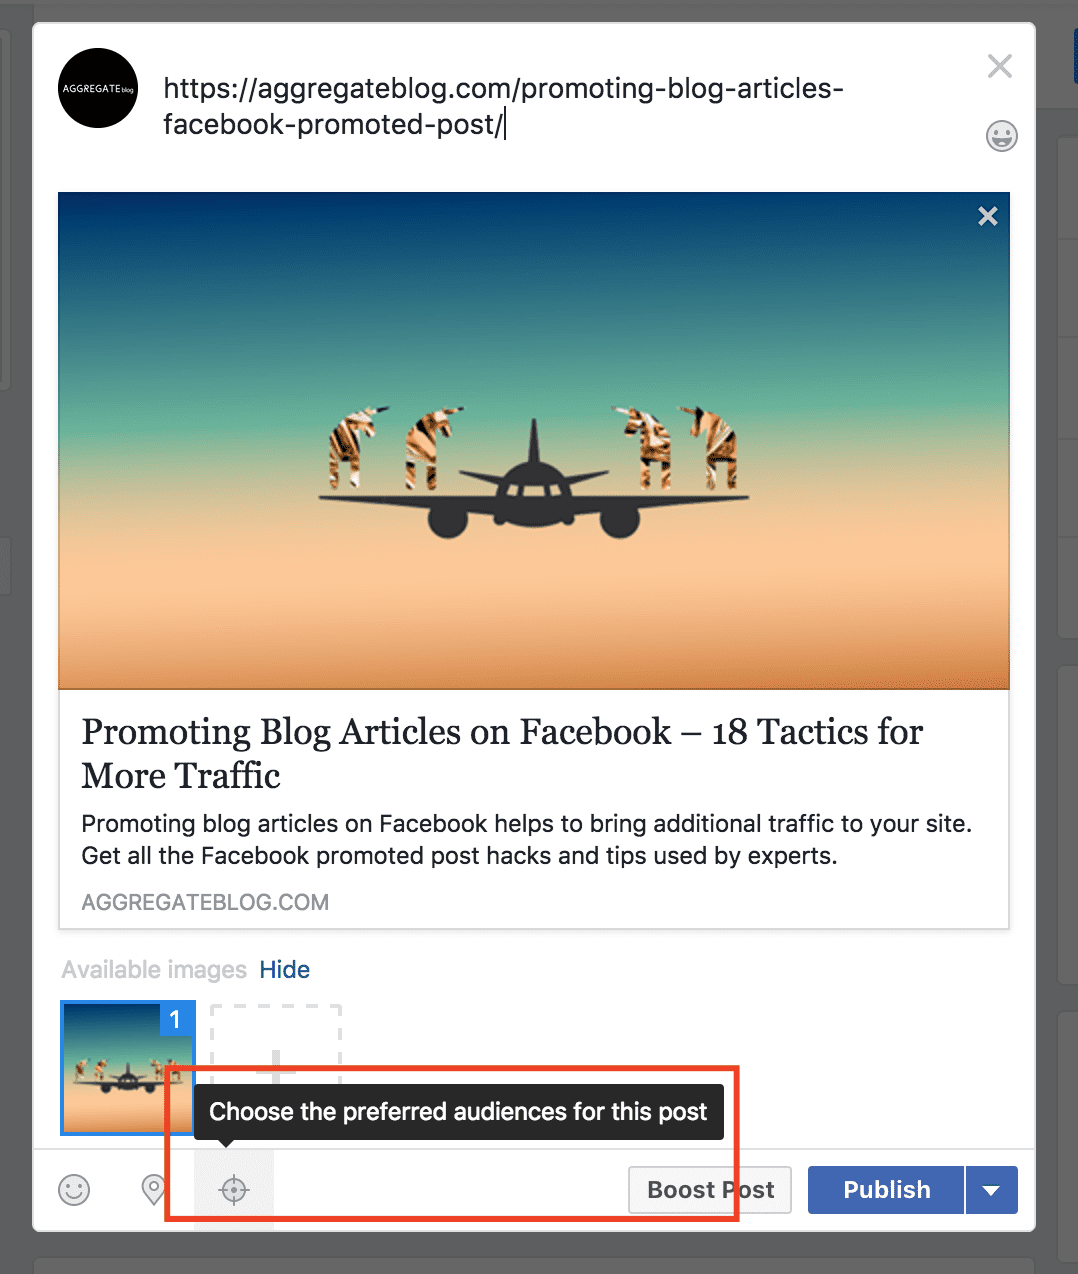
As you click on the icon, you can target people based on their interests. (This is similar to creating a Facebook ad audience)

That’s pretty cool, right?! And it’s getting even better!
You can also restrict the audience of your Facebook post.
This Facebook feature is helpful if you want your post only to reach the people speaking a particular language or living in specific locations.

Can’t see the icon when publishing a Facebook post?
If your Facebook page has fewer than 5,000 likes, you’ll have to activate the Audience Optimization tool manually.
Click the “Settings” tab in the top right corner of your Facebook page. From the “General” tab, you’ll see a row for “Audience Optimization for Posts.” Click on “Edit” and check the box to activate the Audience Optimization. Then, hit the “Save Changes” button.
Use the Audience Optimization tool every time you’re publishing a new Facebook post – it will help your posts reach more people at zero cost.
2. Create Carousel Format Facebook Posts
Hack #2 in one sentence: In addition to single-image posts, you can also create Facebook page posts in carousel and slideshow format.
Sometimes, a single-image Facebook post isn’t enough to tell your story.
So what are you to do? Publish multiple Facebook page posts in a row?
That’s not what Pipedrive did. Instead, they published a Facebook Carousel post.
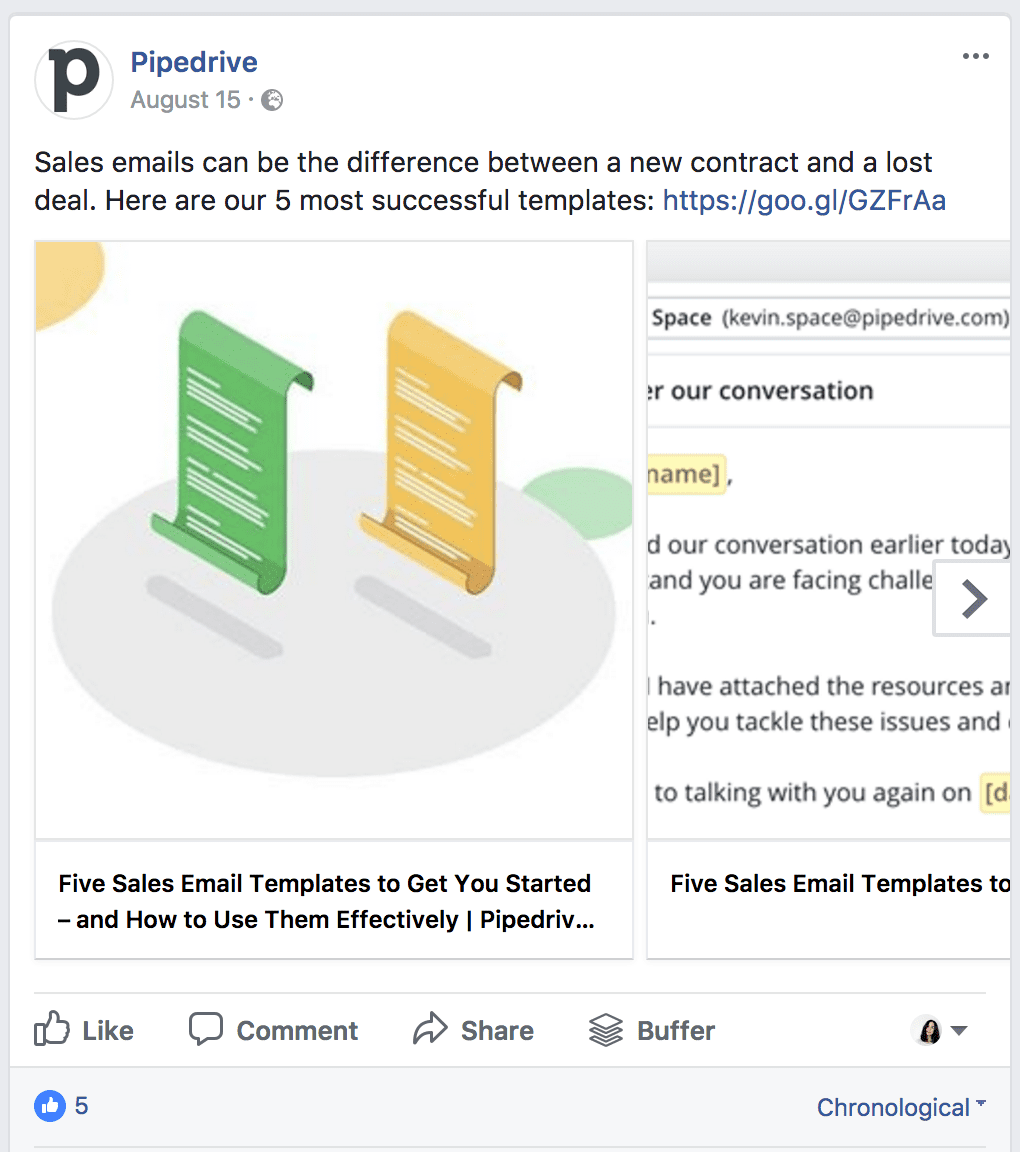
The Facebook carousel ads are often used to showcase multiple products or tell a branded story.
According to a report by Kinetic Social, carousel ads are 10 times better at getting people to click through compared to static sponsored posts on Facebook.

Unlike sponsored carousel ads, the Facebook carousel posts are completely free. Your Facebook advertising cost will be literally zero.
You can add a carousel post to your Facebook page by clicking on the “Share a photo or video” icon on top of your Facebook page. (Not that you’ll need to be using the Business Manager view to be able to post from under your brand’s profile).
Next, select the “Create a Photo Carousel” option.
Up next, you can enter a URL and Facebook will crawl all the images available. For example, you could enter your blog’s URL to share multiple blog articles in a single post.

In addition to sharing and promoting your blog articles on Facebook, you can also create a carousel post with your product’s features by entering the URLs of your landing pages.
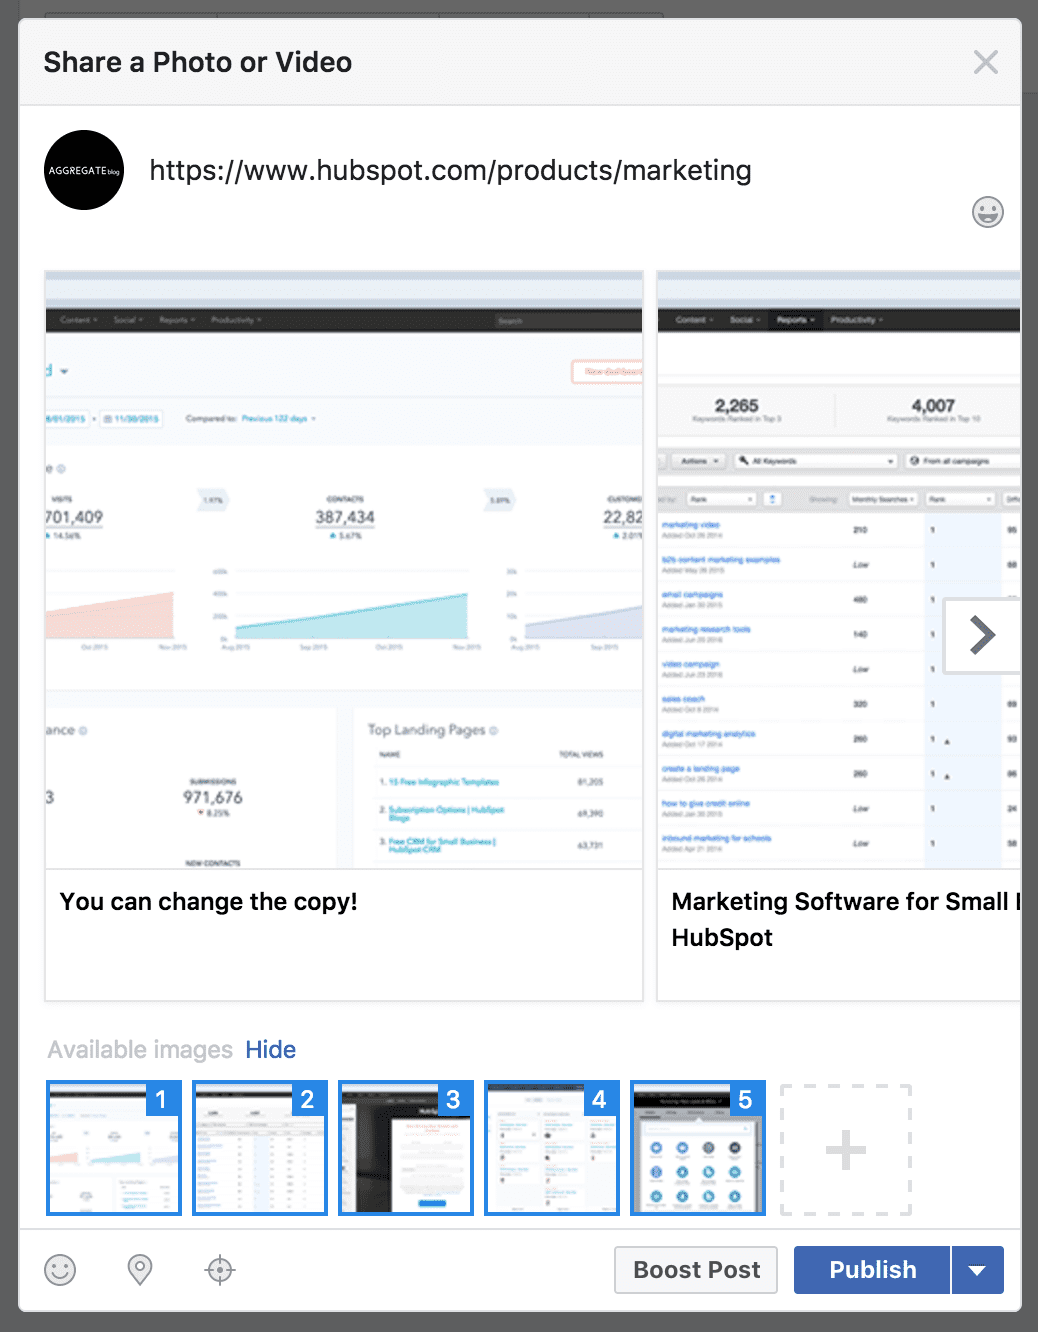
Another idea: Share a single blog article and include multiple images to make your blog promotion differentiate from other stuff in Facebook’s newsfeed.
You can also add a different URL to every image in your carousel post. Simply hover over the image to find a link icon.

Tip: If the link that you want to share doesn’t have enough images or Facebook fails to scrape them, use the + icon to add additional imagery manually.
3. Turn Facebook Post Likes into Page Fans
Hack #3 in one sentence: You can ask people that liked your Facebook post or ad to Like your page in a single click.
As you share and promote your content on Facebook, it will often reach the newsfeed of people that haven’t yet liked your page.
Here’s a simple hack to turn people liking your Facebook posts into your Facebook page fans. (So that you can reach their newsfeeds organically in the future)
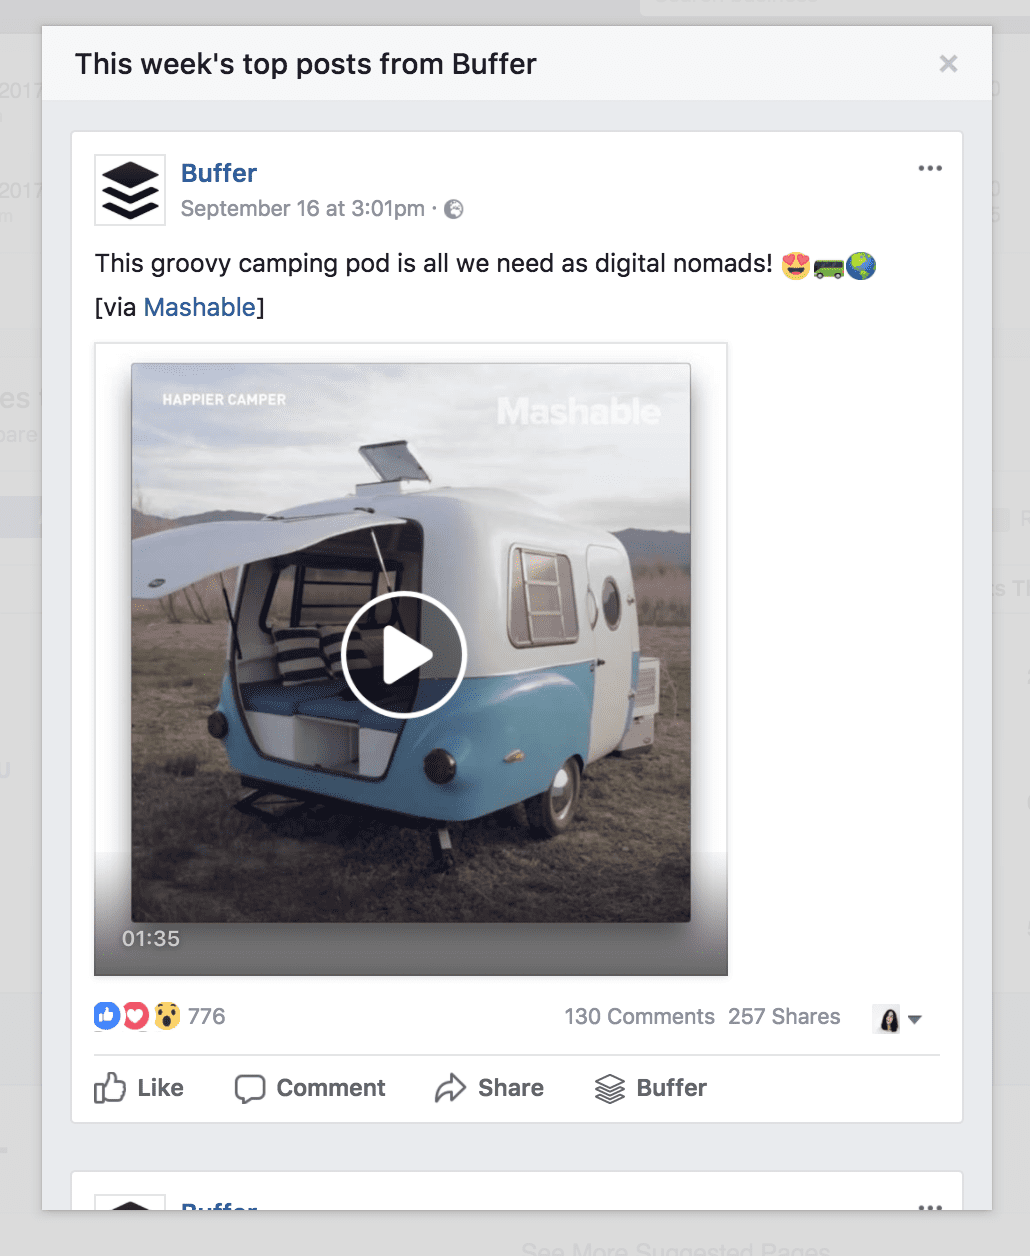
As you click on the likes under your Facebook post, a new window will pop up with everyone that has liked the post.
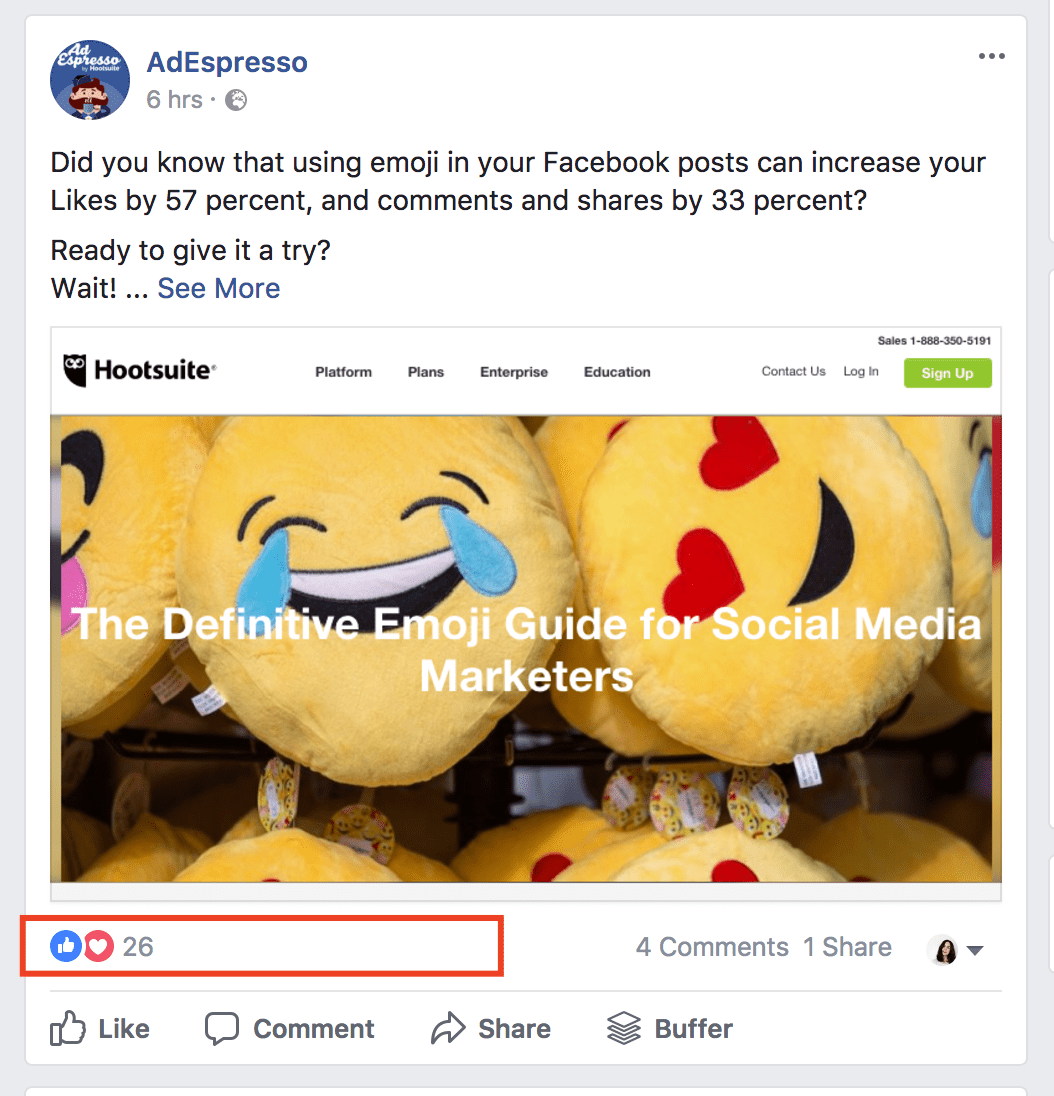
If there’s someone on the list that hasn’t yet liked your Facebook page, you can invite them to do so.

Once you apply this approach to every Facebook post you share, you’ll be able to grow your Facebook fan base at a faster pace.
On a side note, inviting people to like your Facebook page is highly time sensitive. If they’ve liked your post 3 weeks ago, they might not remember your brand anymore. Always invite people to like your Facebook page in 24h since they liked your post.
4. See the List of Your Facebook Page Fans
Hack #4 in one sentence: There is a place to see all the people who like your Facebook page. (Yes, you can finally check if your BFF is liking your page)
Sometimes, it may happen that you need a list of people liking your Facebook page.
Maybe you want to do user research. Or simply check whether all your friends are liking your page.

Whatever the reason, you should know how to access the list of people liking your Facebook page.
Here’s how it works: Go to your Facebook page Settings and click on “People and Other Pages”. Here, you can see the people and brands that like or follow your page. You can also manage banned and blocked users.
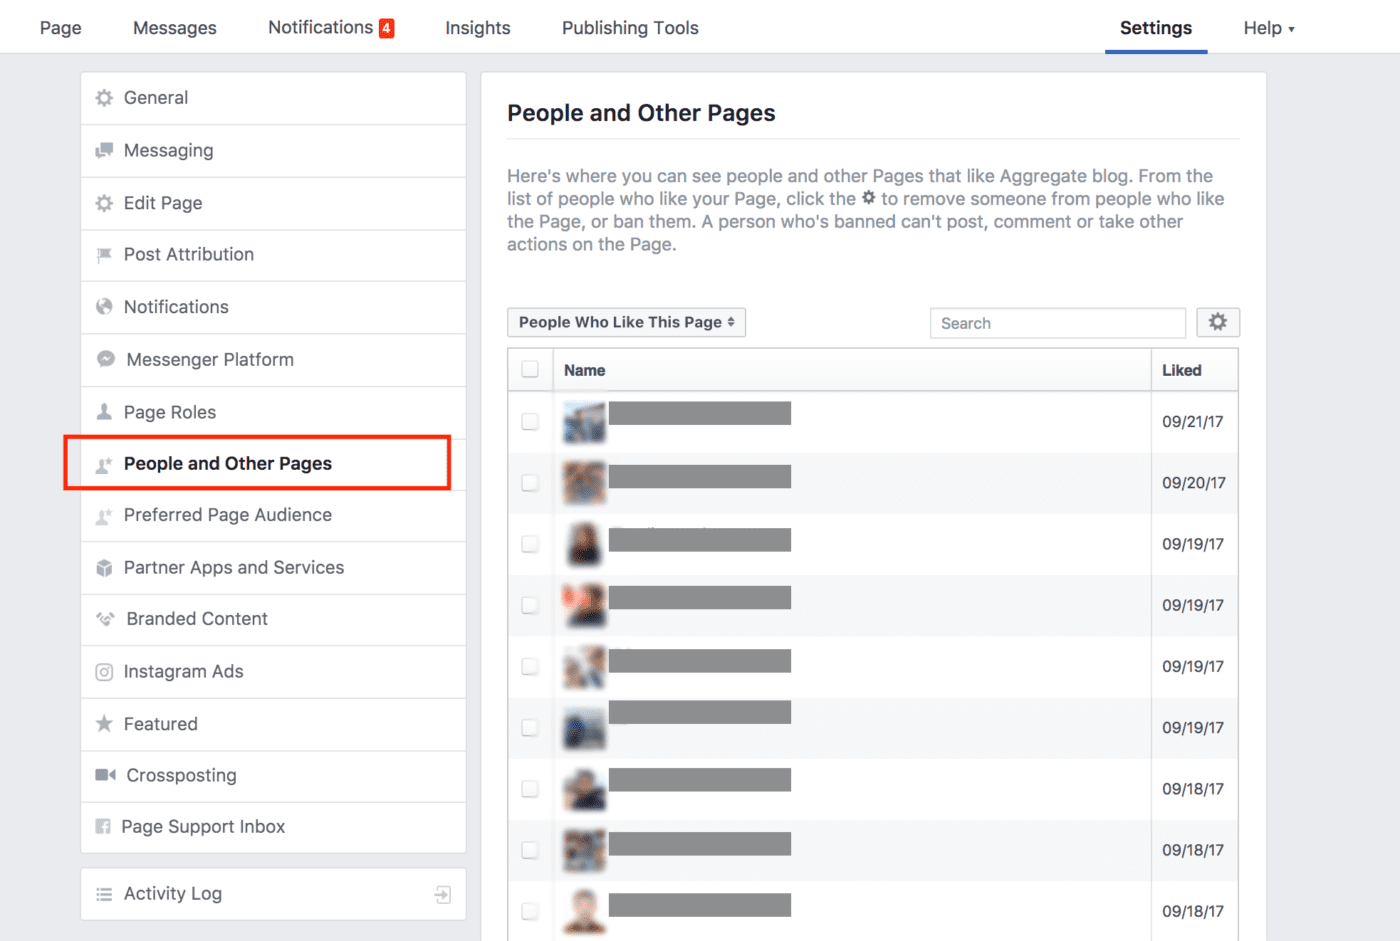
You can use the information about your Facebook page fans to do user research and better understand your target audience.
5. Use a Cover Video Instead of a Cover Image
Hack #5 in one sentence: You can add a GIF or video as your Facebook cover photo – just to ? things up a bit.
If you want to level up your social media presence, here’s a simple way to do it: change your static cover image to a cover video.
Here’s a nice example by Flixel. Notice the cinematographic elements.

Cover videos must be at least 20 seconds long, but no more than 90 seconds long. The recommended video size is 820px x 462px.
Cover videos should auto-play and auto-loop, so it might be a good idea to create a GIF.
Here are three cover video ideas to inspire you:
- Create a cinemagraph or your product in action
- Create a short team video or boomerang
- Create an animated video based on your existing product videos
Here’s a guide to creating GIFs in Photoshop. I recommend that you check it out – it’s easier than you think! (You’ll just have to mix n’ match the layers in the right order)
6. Spy on Your Competition With Pages to Watch
Hack #6 in one sentence: Use the Pages to Watch tool to review all the posts published by your competitors or favourite brands in a single feed.
If you want to stay ahead of the competition and know what the industry’s leaders are up to, you’re going to need to check their Facebook pages.
However, going manually through 10+ pages every week is a highly tedious job.
The Pages to Watch tool is designed to help you keep an eye on both competition and innovative brands that inspire.

You can find this Facebook feature it by navigating to your Facebook page Insights and scrolling down on the page.

As you scroll down the page, you will find the Pages to Watch feature. Note that Pages to Watch is a tool available to all Facebook pages with 100 or more fans. So if you’ve got less than 100 fans, you’ll need to add more. (Try using hack number 3)
Facebook will suggest you some pages to follow. You can also type in the names of brands you want to check out and add them to the list.
After you’ve added some brand pages to your watchlist, you can see the following stats:
- Total page likes (and the % +/- change from the previous week)
- How many times a page has posted to Facebook this week
- Their total engagement count for the week
As you click on a particular brand’s icon, you’ll be able to see all their past week’s Facebook posts, filtered by engagement (from the most engaging to the least engaging).
Tip: You can add Advertise. Grow. blog to your Pages to Watch list to be always informed about the latest Facebook updates and new formats of Facebook posts.
7. Edit Your Posted Links’ Copy
Hack #7 in one sentence: Due to a recent update, as you publish a link on Facebook, you’re not able to change the default headline . Or maybe you can…
Up until lately, you were able to edit the headline and link description of every URL you shared on Facebook.
That’s not the case anymore.
Now, whenever you share a link on Facebook, it comes with the static headline and description.

Luckily, there’s a workaround that lets you edit all the texts of your Facebook page post, courtesy of Jon Loomer.
Here’s what Jon suggests:
“You see, when you create an ad, the link information that you provide will go through a review process. Facebook will check to be sure that the link preview information that you provide is acceptable. Once that approval is granted, you can publish your ad organically.”
Here’s how the hack works:
1. Publish the Facebook post you want to share as a Facebook ad.
2. Wait for Facebook’s approval to your new ad.
3. Pause the ad before it starts to deliver (so you won’t have to pay anything).
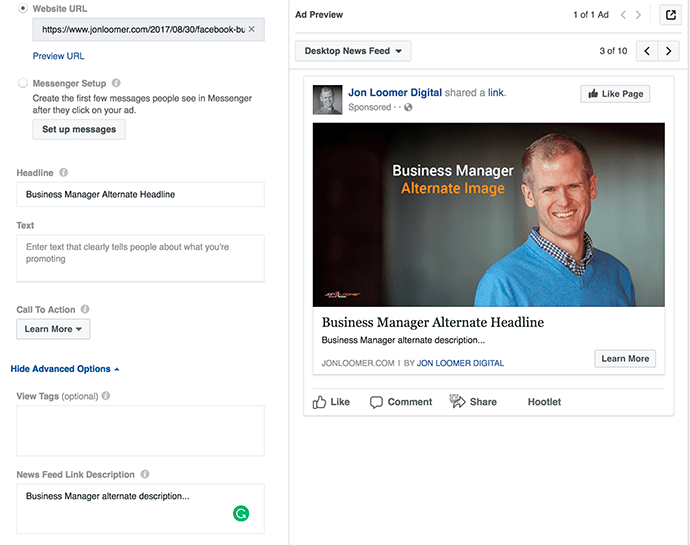
4. Once your ad is approved, it will appear in your Page Posts section in Facebook Business Manager.

5. Check the box next to your ad and select “Publish”.
And that’s it! Your custom Facebook post will appear on your Facebook page.
8. Discover the Best Posting Times
Hack #8 in one sentence: You can see the charts with your Facebook page’s engagement levels and see when your audience is most active.
When is the best time to post on Facebook?
According to an article in Buffer’s blog, there is none.
Here’s what the author suggests instead: Publish on your Facebook page
- When your data tells you
- When it’s most relevant
In fact, you can easily see when exactly most of your fans are online.
Navigate to the Page Insights page and select “Post”. Here’ you can see the weekdays and hours of day with the highest potential of reaching your audience.
You can hover over each individual day to see an overlay of how that day looks vs the averages.

As you scroll down on the page, you can also see individual posts and their time of publishing. Analyze the engagement and reach of each post to uncover when’s the most reasonable time for publishing.

Note that if some of your Facebook posts were boosted, they’ll have a higher reach than other content.
You can experiment with your posting times, maybe even test every hour of day and every weekday to get closer to the perfect posting time.
9. Schedule Your Facebook Posts
Hack #9 in one sentence: You can schedule multiple Facebook posts in advance to save time and ensure you won’t forget to publish anything important.
Once you know the best times for publishing on Facebook, you can build your publishing strategy around these hours.
But what if you’re at a meeting or somewhere without WiFi connection? Does is mean you won’t be able to make that all-times-best-viral Facebook post?

Here’s good news: you can easily schedule all your Facebook posts days or weeks ahead. Simply use the “Schedule” feature instead of immediately publishing your post.

Scheduling your posts can also be handy if you want to prepare a Facebook post and confirm with other team members before publishing.
10. See More Boosted Post Statistics
Hack #10 in one sentence: As you promote your Facebook posts with a Boost, you can also see that ad in the Facebook Ads Manager for additional metrics.
Boosted posts are THE easiest way to promote your blog articles/updates/messages on Facebook.
All you need to do is hit the “Boost Post” button, enter a budget and target audience, and off you go. The not-so-nice thing about this is that the ease of usage often makes marketers careless about their results.
Do you know what were the results of your last Boosted post?
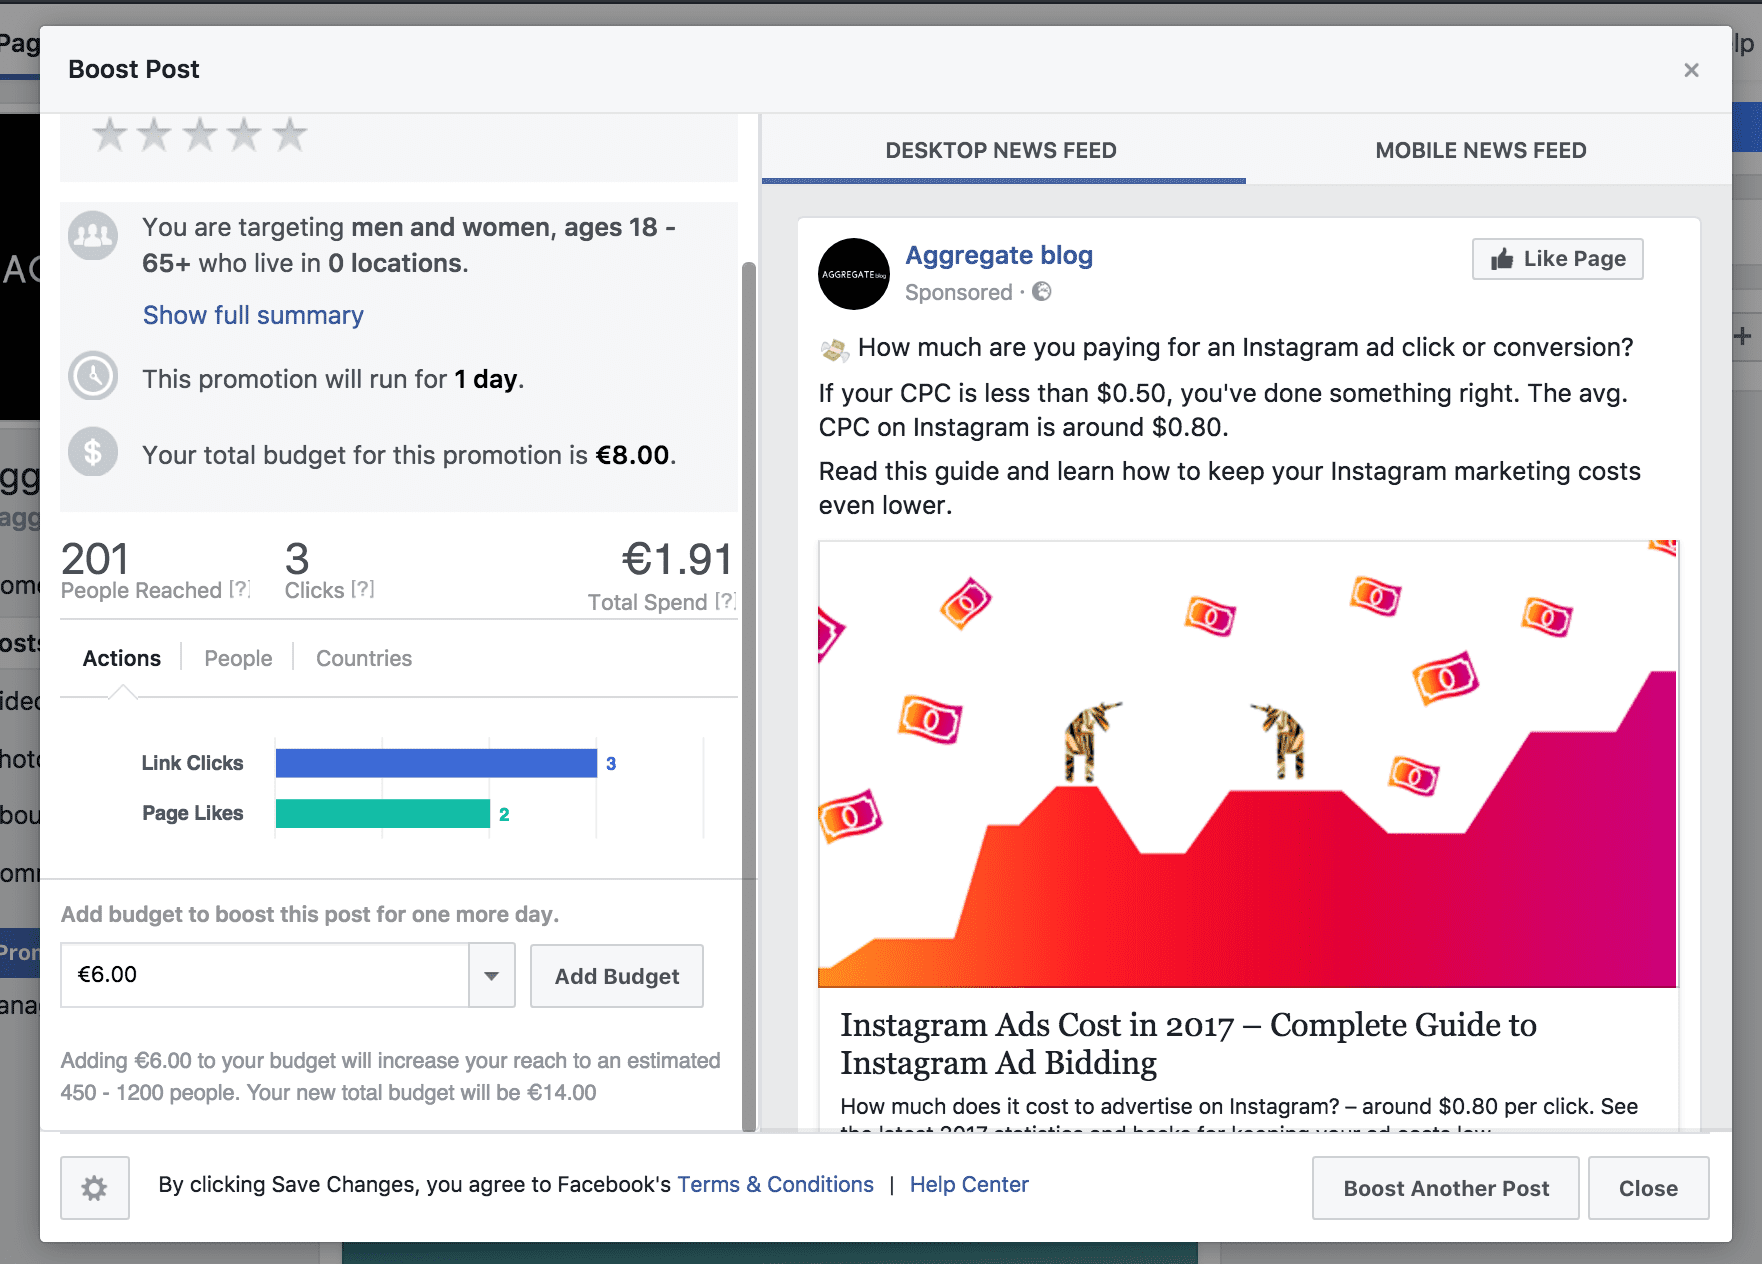
As you look at the report compiled by Facebook, you can only see:
- How many people your Boosted post reached
- How many clicks people made
- How many people that saw your promotion liked your Facebook page
That’s about all the information you can get from these reports. And that’s clearly not enough.
There is much more relevant data you should know about your promoted posts, such as:
- The click-through rate of your post – did the post do better or worse than previous ones in terms of engagement?
- The number of website conversions – did some people subscribe to your newsletter or react to other offers on your website?
- The TOP placements – did you Facebook post perform best on Desktop newsfeed, Mobile newsfeed or Instagram?
To find the answer to all these questions, go to the Facebook Ads Manager, where you can see all your boosted posts as separate ad campaigns.

Feel free to customize the columns and break down your campaign by different variables, e.g. placement. Read this Instagram ad reporting guide to learn to navigate the Ads Manager reports.
Based on this information, you can optimize your next Boosted posts and also use the insights to get better results across all your Facebook and Instagram campaigns.
11. Set Up Facebook Auto-optimization Rules
Hack #11 in one sentence: You can set up rules to be notified when your campaign starts underperforming. Or even automate part of your ad management. For free.
Have you heard about Facebook Automated Rules?
Many marketers use advanced Facebook advertising tools that help to optimize campaigns. What they don’t know is that Facebook has most of the same auto-optimization features.
Here’s the best part: Facebook’s Automated Rules are FREE.

Here’s how Facebook’s auto-optimization rules work:
You can set up four different consequences if the conditions have been met:
- Turn off the ad campaign, ad set or ad
- Send notifications to the ad manager (that’s you)
- Adjust budgets (increase/decrease daily/lifetime budget by…)
- Adjust manual bids (increase/decrease bid by…)
To set up an automated rule set, select a campaign, ad set or Facebook ad and go to the editing panel (Icon on the right side of the reporting table). Next, click on the “Create Rule” button to create a new rule set.

You can create rules by selecting some conditions and telling Facebook what to do once the conditions are met.
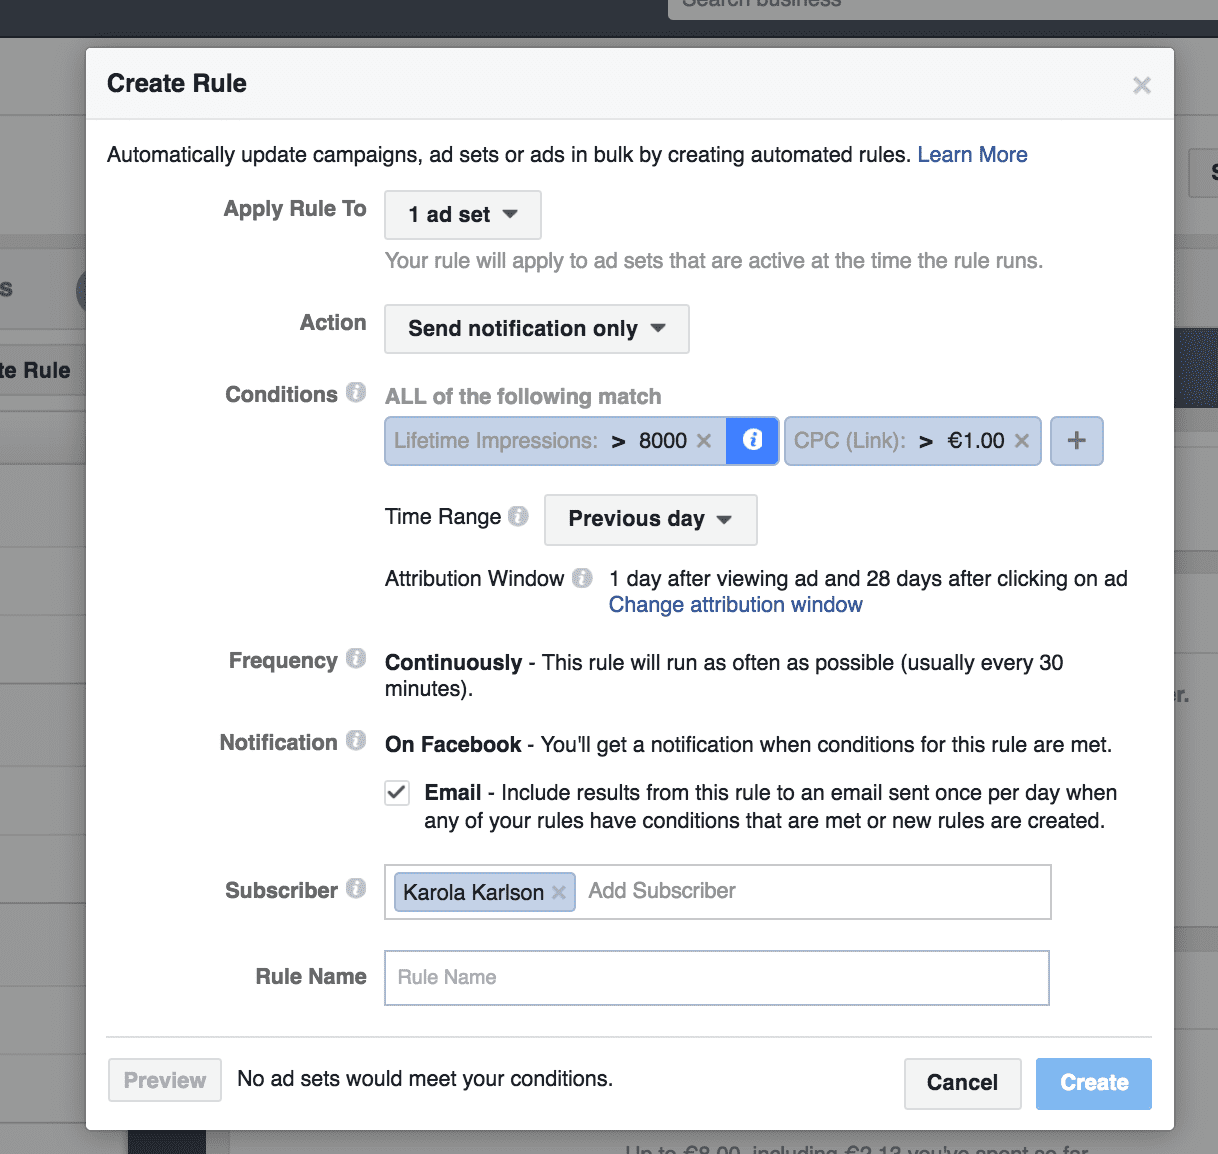
Here are some Facebook automated rules that you can easily apply:
- Be notified if the CPC of your ad campaign is higher than you expected – e.g. if you’re willing to pay the maximum of $0.80 per click, set up a rule that notifies you if the CPC is higher.
- Be notified about a high ad frequency – if your ad frequency reaches 3 points, your target audience has seen it a lot of times. It may be a good idea to optimize the ad set at this point. For Facebook retargeting campaigns, your ad frequency can be up to 10 points.
- Increase budgets for best-performing ad sets – when running an A/B test with multiple ad sets, you can have Facebook automatically allocate more (e.g. a 30% increase) budget to top-performing ad variations while lowering the budget for lower-performing ad sets by 30%.
Tip: Instead of creating different rule sets for each campaign and spending hours on the setup, try to come up with some universal rules that can be applied to all campaigns at once.
This feature is especially beneficial when managing a large set of campaigns with fast-changing results, e.g. a discount offer or Facebook App Install ads.
12. Quickly A/B Test Multiple Target Audiences
Hack #12 in one sentence: Facebook Ads Manager has some built-in A/B testing features that you can use to set up simple split tests.
When it comes to Facebook and Instagram ad targeting, it’s sometimes hard to tell who your ideal audience is.
So you might want to test two or more different target audiences to see which one delivers the best results.
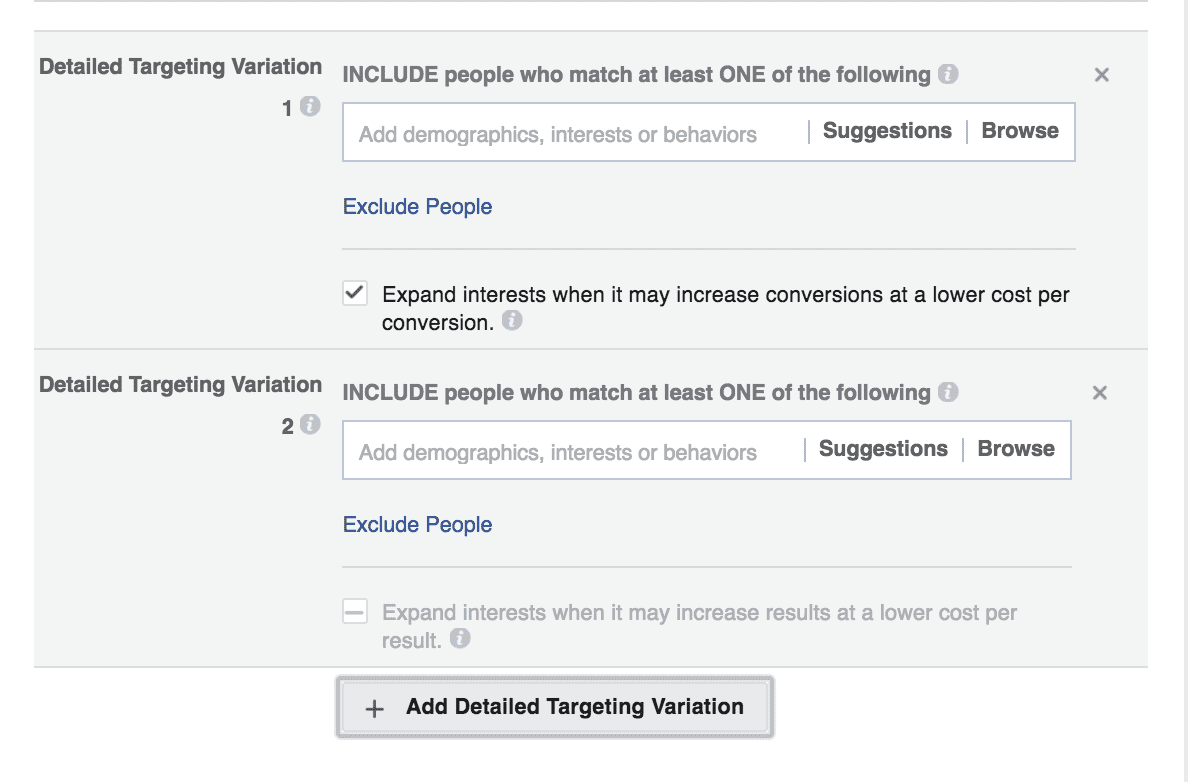
The quickest way to set up split testing campaign on Facebook is to use the “Create Multiple New Ad Sets” feature.

While this Facebook A/B testing feature is quite limited regarding the campaign elements you can test, it makes it really easy to compare multiple target audiences.
Simply click on the “Add Detailed Targeting Variation” to add more than one audience variation (and create multiple ad sets).
Tip: If you’re interested in testing other ad elements such as your Facebook ad design or different emojis in Facebook ads, you should create multiple ad sets that each contains one creative variation.
You can learn more about successful Facebook ad A/B testing here.
Quick Recap ↴
Did we manage to include at least one hack you didn’t know about? Did we miss anything?
All things considered, you’re now equipped with the TOP secret Facebook marketing hacks that haven’t been used by your competition (at least not yet…)
Make sure to share them with your boss, maybe mention some to your marketer-friends, and do your best to keep them from everyone else!
Want to learn even more Facebook ad hacks? Check out this article: TOP Facebook Updates in Q1 2018 Every Marketer Should Know